I recently ran across a post in the YouTube PIXimperfect channel that ran through how to make 5 specific photo improvements with Photoshop. All of them have application and I want to learn them. This post walks through how to Auto-Fix Colors technique 1 from the videos. The example removes a blur cast from an image that resulted from shooting through a tinted window.
Sample Images for the video are available here.
Unmesh flies through his steps, I'll be taking the video apart to get the steps to a form that I can use.
First Technique Provided Example
His first example is shot through a high window in Dubai. It has a very heavy blue/green cast from the window's tint.The sample he provides to go through the tutorial is a JPG image with a watermark. I have to imagine this process will work better for a RAW image, but time will tell.
I grabbed the image and opened it in my Photoshop, 28.11.0.
Add a Curves Adjustment Layer
Add a Curves adjustment by clicking the split circle icon at the bottom of the right side panel and picking curves from the pop-up menu.
Pick Auto-Option... from Hamburger Button
The hamburger (three horizontal line button) at the top of the pop-up menu contains an Auto Options... choice. Pick that one.
Pick First of the Choices & Snap Neutral Midtones
The menu will preselect the forth radio button. All of the first three will enable Snap Neutral Midtones. We want that option, so click one of the first three and click Snap Neutral Midtones on. This makes for a dramatic improvement,
Try the Other Two Auto Choices
For this example the 2nd and 3rd choices are even better. Unmesh picks the third as his favorite, Find Dark & Light Colors. Settle on your favorite and click OK.
This is a potential stopping point, but of course Unmesh continued.
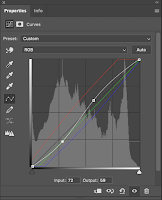
Add Contrast by Dragging the Levels to a Bit of an S Curve
 I'm not a confident curves user, so I had to watch carefully and take a couple of swings at it. Essentially the process is just grabbing the lower middle portion of the white diagonal line and drag it down and right a bit. Then repeat by grabbing the the line in upper portion and drag it up and left a bit.
This is an entirely to taste step, do what looks right and remember we are being non-destructive here so later adjustments are easy.
The image looks tremendously better at this point.
Add Warmth to the Image
Add a Color Lookup adjustment layer in the same way the Curves Adjustment layer was added. Unmesh picked the first option 3DLUT File and then Crisp_Warm.look. This warms up the image quite a bit, in fact too much. We really only want it in the highlights.
Limit Color Lookup Warmth to the Highlights
To restrict the Color Lookup we need to:
1. Double Click the Color Lookup Layer (right side bar) to access Layer Style dialog.2. Move the left slider on the Underlying Layer (bottom of dialog) to the right (about 110)3. Click Slider with Option ⌥ key held down to break the slider apart.4. Drag right part of slider further right (200, this like other numeric values are to taste)5. Drag left part of slider further to left (46)
That's It!
At this point I have successfully followed the steps outlined by Unmesh and dramatically enhanced the image.
I decided to repeat the above on a couple of images. One, taken by my father in-law, Peter Johnson from a moving train through a tinted window seemed like the best one to show here. This image is pretty sad, but it responded to the first steps really well. Adding warmth didn't help at all so I left that step out.
I also did some general cleanup in Photoshop and sharpened the image in Topaz. It moved from pathetic to barely usable, but still it is a memory image, so I am glade I have it.
 |
| Original Image Edited Image |


No comments:
Post a Comment